
I have seen many people asking this in many forums over and over, how to back up the DVDs by making Smaller DVD rips ??
Its pretty simple though, one may archive great quality DVD RIPs with available free tools. I would try to list a tutorial on it from start to end how to do it…
Software Requirements:
1. Windows OS (2000_sp4 or adobe)
2. DVD Dycripter (Free) — Download Here3. AutoGK (Free) — Download here
Hardware Requirements:
1. DVD ROM
2. 10 GB Free HDD Space with NTFS Partition
3. A Fast Computer….in the sense at least 1 GB of RAM and minimum of dual core processor so that u wont have to wait till the eggs hatch.
The Process
We will use DVD Dycripter to rip a DVD 5 or DVD 9 in a single VOB File… If you look in the DVD file structure you may find for one movie there number file (VOB 0.99GB) in sequence… So the idea is use this software to create one single large VOB for encodning
Start the DVD Dycripter….
In the Main window change the MOD to IFO

Now I assume you have the DVD which you want to rip, in you DVD ROM, the picture now would look like this one, above…
This Bellow Step you may Skip, its for advance usage only if you have problem then prefer here….
Its pretty simple though, one may archive great quality DVD RIPs with available free tools. I would try to list a tutorial on it from start to end how to do it…
Software Requirements:
1. Windows OS (2000_sp4 or adobe)
2. DVD Dycripter (Free) — Download Here3. AutoGK (Free) — Download here
Hardware Requirements:
1. DVD ROM
2. 10 GB Free HDD Space with NTFS Partition
3. A Fast Computer….in the sense at least 1 GB of RAM and minimum of dual core processor so that u wont have to wait till the eggs hatch.
The Process
We will use DVD Dycripter to rip a DVD 5 or DVD 9 in a single VOB File… If you look in the DVD file structure you may find for one movie there number file (VOB 0.99GB) in sequence… So the idea is use this software to create one single large VOB for encodning
Start the DVD Dycripter….
In the Main window change the MOD to IFO
Now I assume you have the DVD which you want to rip, in you DVD ROM, the picture now would look like this one, above…
This Bellow Step you may Skip, its for advance usage only if you have problem then prefer here….
————————– Advance Step ——————————–
Now go to Settings, and do the followings,In TAB File Mode Set option File Splitting to None

Move to next TAB, IFO MODE , and set the option File Splitting to None…
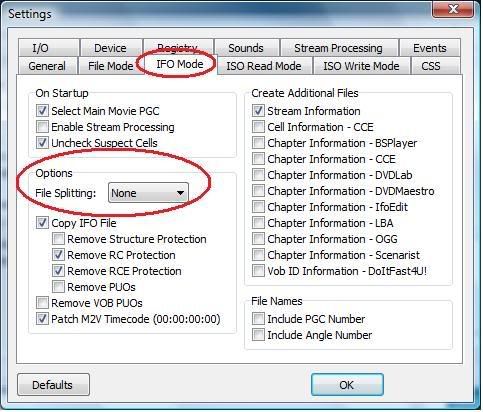
Once again to next ISO Read Mode and set the option File Splitting to None…
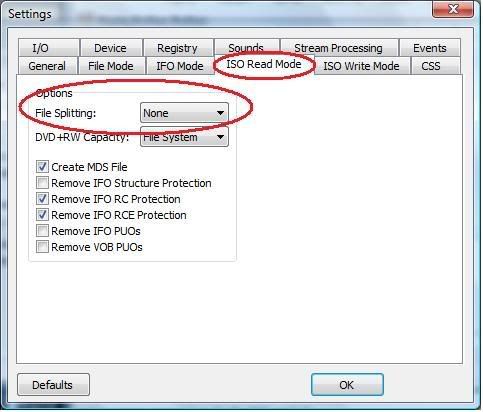
This will allow you to receive one single large VOB file… around 4 GB for DVD 5 and around 7.5 GB for a DVD 9…
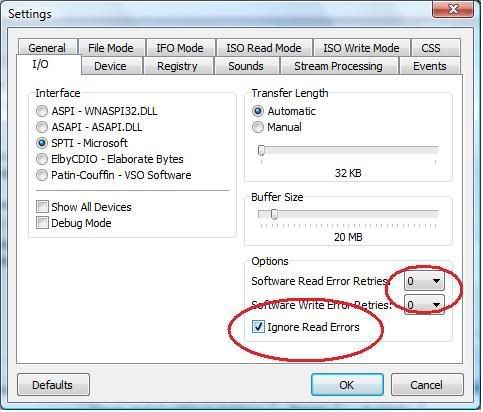
Next step will make sure that DVD Dycripter doesn’t force re-read for the Damage DVD Sectors…. This helps greatly up to 20 times faster when you get stuck with a DVD which comes with Read Error….
Go to TAB I/O and set the option for Read and Write error retried to 0, also Check on the Box says, Ignore Read Errors…
You are done with advance Settings of the DVD Dycripter !!!! Now we may proceed to dycript the DVD….
————————– End of Advance Settings —————————
Select the PPG in the Input box which is the longer in time format, and then Select the place where you want your File to go, (make sure its one NTFS Partition with atleast 10 GB space in it) and Hit the button to Dycript….
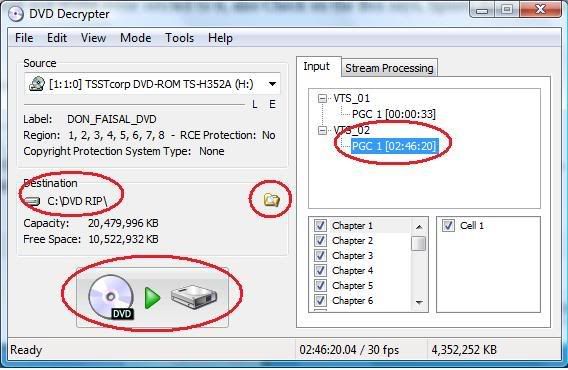
It will start Coping Data to your HDD, usually with good DVD media it takes around 15 mins !!!!
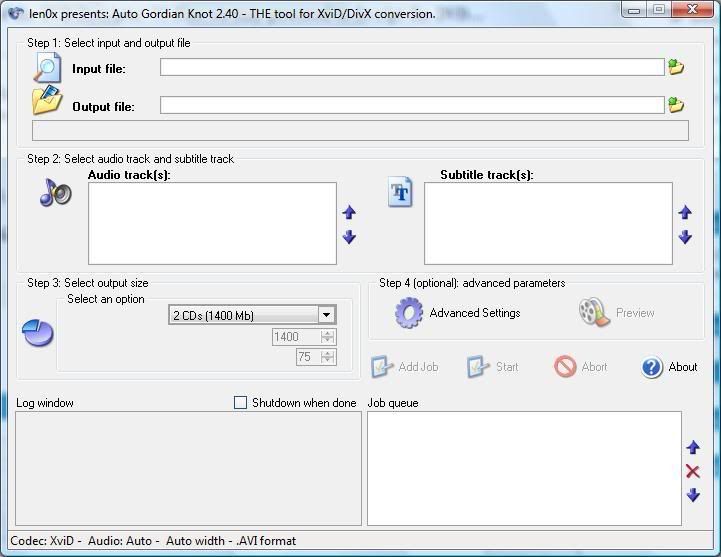
Once you are done, fire up the AutoGK …..
Now Browse from the Input Box to select the file which you just have copied using DVD Dypripter… Then Select the Size you want 1 CD or 2 CD, for Good quality which you want to view in 19″ Screens I would say Select 2 CD !!! how ever 700 MB too will just work out fine tooo !!!
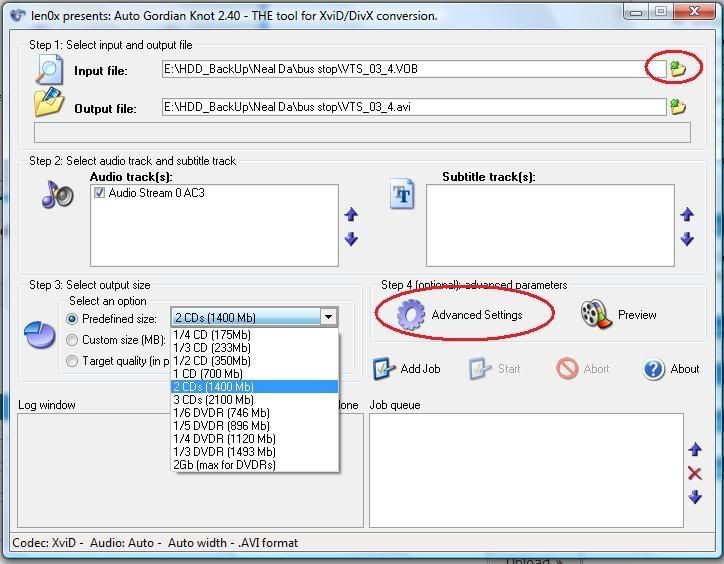
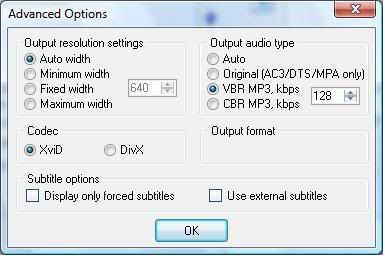
Now Please click on Advance Settings… and in the Advance TAB, Select Codec as xvid and Resolution to auto Width and Audio Type to VBR MP3 128kbps !!!!
Now at the Main AutoGK Window, Click add job and the Hit start Button… Thats it… Auto GK will do the rest for you…

No comments :
Post a Comment